Hello , In this article we are going to create a form that a user can submit a data by filling a form through the front end then the admin can view the data submitted throuh the admin interface, Print the data in different formats.
Lets define a problem here, Students did exams,exams marked and the results released by the school, Some students are not staisfied with the results, The student affected files a case aginst the results,The administration hence comes up a solution by creating a form that users can fill in their details and their problems, the problems include missing marks,stray units,missing units etc..
There are many ways of doing this but here django is going to give us a better solution
Lets start
1) create the project and app
C:\Users\LENOVO\Desktop\follow>django-admin startproject followup

C:\Users\LENOVO\Desktop\follow>cd followup

C:\Users\LENOVO\Desktop\follow\followup>python manage.py startapp myapp

C:\Users\LENOVO\Desktop\follow\followup>
2 . Configure your urls, views and templates Check on this simple django set up setup
3)Lets define our models - Fields and the data structures
In our case we are buiding a form that capture the Student data i.e the name, admmision number and the issue and a short message.
Lest go
from django.db import models
class Contact(models.Model):


    name = models.CharField(max_length = 200)
    admision = models.EmailField()
    issue = models.CharField(max_length = 200)
    subject = models.TextField()

    def __str__(self):
        return self.name
Then run migrate and make migrations command in the CLI to create your tables from the models
C:\Users\LENOVO\Desktop\follow\followup>python manage.py migrate
Operations to perform:
  Apply all migrations: admin, auth, contenttypes, sessions
Running migrations:
  Applying contenttypes.0001_initial... OK
  Applying auth.0001_initial... OK
  Applying admin.0001_initial... OK
  Applying admin.0002_logentry_remove_auto_add... OK
  Applying admin.0003_logentry_add_action_flag_choices... OK
  Applying contenttypes.0002_remove_content_type_name... OK
  Applying auth.0002_alter_permission_name_max_length... OK
  Applying auth.0003_alter_user_email_max_length... OK
  Applying auth.0004_alter_user_username_opts... OK
  Applying auth.0005_alter_user_last_login_null... OK
  Applying auth.0006_require_contenttypes_0002... OK
  Applying auth.0007_alter_validators_add_error_messages... OK
  Applying auth.0008_alter_user_username_max_length... OK
  Applying auth.0009_alter_user_last_name_max_length... OK
  Applying auth.0010_alter_group_name_max_length... OK
  Applying auth.0011_update_proxy_permissions... OK
  Applying sessions.0001_initial... OK

C:\Users\LENOVO\Desktop\follow\followup>python manage.py makemigrations
Migrations for 'myapp':
  myapp\migrations\0001_initial.py
    - Create model Contact
Now the tables are created as you can see in the mogrations folder
4 . Regiter your models in the admin site (admin.py file), then create a super use(admin)
from django.contrib import admin

from . models import Contact

admin.site.register(Contact)


#create a super user

C:\Users\LENOVO\Desktop\follow\followup>python manage.py createsuperuser

Username (leave blank to use 'lenovo'): ***
Email address:***
Password:
Password (again):
Superuser created successfully.

C:\Users\LENOVO\Desktop\follow\followup>python manage.py migrate
Operations to perform:
  Apply all migrations: admin, auth, contenttypes, myapp, sessions
Running migrations:
  Applying myapp.0001_initial... OK
start the server and go to the admin site
C:\Users\LENOVO\Desktop\follow\followup>python manage.py runserver
Watching for file changes with StatReloader
Performing system checks...

System check identified no issues (0 silenced).
January 06, 2021 - 09:24:04
Django version 3.0.3, using settings 'followup.settings'
Starting development server at http://127.0.0.1:8000/
Quit the server with CTRL-BREAK.

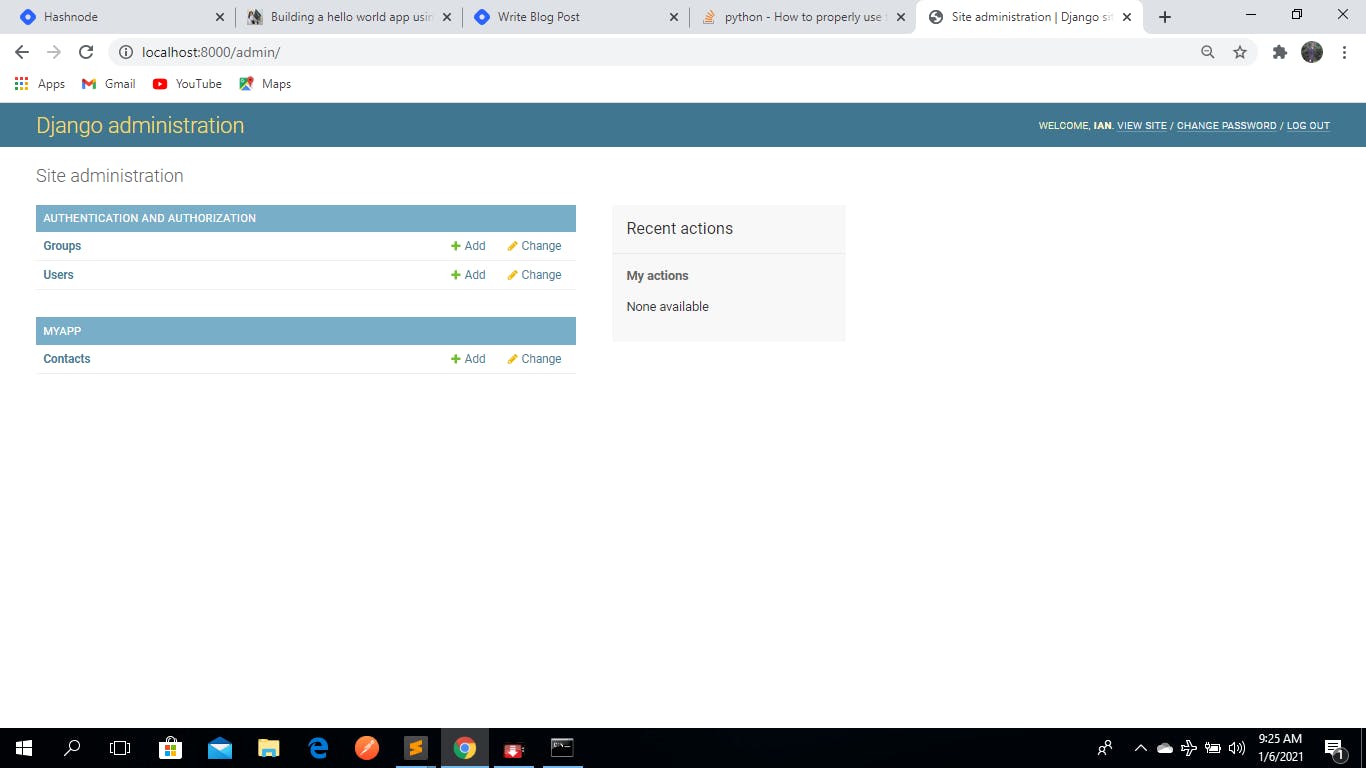
#type the following in the url to access the admin site

http://127.0.0.1:8000/admin
you shoud see somthing like this

5 . Define our views
In our views we have
from django.shortcuts import render

from . models import Contact

from django.contrib import messages


def index(request):

    contact = Contact()
    post = Contact.objects.all()


    if request.method =="POST":


        name = request.POST.get('name')
        admision = request.POST.get('admision')
        issue = request.POST.get('issue')
        subject = request.POST.get('subject')


        contact.name=name
        contact.admision=admision
        contact.issue=issue
        contact.subject=subject

        contact.save()

        messages.success(request , 'Submitted Succesfully ')


    return render( request , 'index.html', {"post": post } )
Then our template folder in index.html file your created should have the following, i have used bootsrap here for the form
<!DOCTYPE html>
<html>
<head>
    <title>form</title>

    <link href="https://cdn.jsdelivr.net/npm/bootstrap@5.0.0-beta1/dist/css/bootstrap.min.css" rel="stylesheet" integrity="sha384-giJF6kkoqNQ00vy+HMDP7azOuL0xtbfIcaT9wjKHr8RbDVddVHyTfAAsrekwKmP1" crossorigin="anonymous">
    <script src="https://cdn.jsdelivr.net/npm/bootstrap@5.0.0-beta1/dist/js/bootstrap.bundle.min.js" integrity="sha384-ygbV9kiqUc6oa4msXn9868pTtWMgiQaeYH7/t7LECLbyPA2x65Kgf80OJFdroafW" crossorigin="anonymous"></script>
</head>
<body>

    <div class="text-center" style="margin-top: 50px;">

        {% if messages %}

             {% for message in messages %}

             <div class="alert alert-success font"><b> {{ message }} </b></div>

             {% endfor %}

          {% endif %}
</div>


 <!--contact Form Starts Here -->
    <div class="subscribe-form" id="contact">
      <div class="container">
        <div class="row">
          <div class="col-md-12">
            <div class="section-heading">
              <div class="line-dec"></div>
              <h1>CONTACT </h1>
            </div>
          </div>
          <div class="col-md-8 offset-md-2">
            <div class="main-content">
              <p><u> please fill the form</p></u>
              <div class="container">
                <form method="post">

  {%  csrf_token %}

  <div class="form-group">
    <label for="exampleFormControlInput1">Name</label>


    <input name="name"  class="form-control" id="exampleFormControlInput1" placeholder="please enter your name" required="" >
  </div>

  <div class="form-group">
    <label for="exampleFormControlInput1">Admision</label>
    <input name="admision"  class="form-control" id="exampleFormControlInput1" placeholder="please enter your addmision number" required="" >
  </div>


   <div class="form-group">
    <label for="exampleFormControlInput1">issue</label>
    <input name="issue" class="form-control" id="exampleFormControlInput1" placeholder="please state your issue i.e missing mark,stray unit,missing unit" required="" >
  </div>


  <div class="form-group">
    <label for="exampleFormControlTextarea1">Subject</label>
    <textarea name="subject" class="form-control" id="exampleFormControlTextarea1" rows="3" placeholder="please leave your message i.e subject affected" ></textarea>
  </div>

  <center><input class="btn btn-primary" type="submit" value="Submit"></center>
</form>
</div>


</div>
              </div>
            </div>
          </div>
        </div>
      </div>
    </div>
    <!-- contact Form Ends Here -->


</body>
</html>
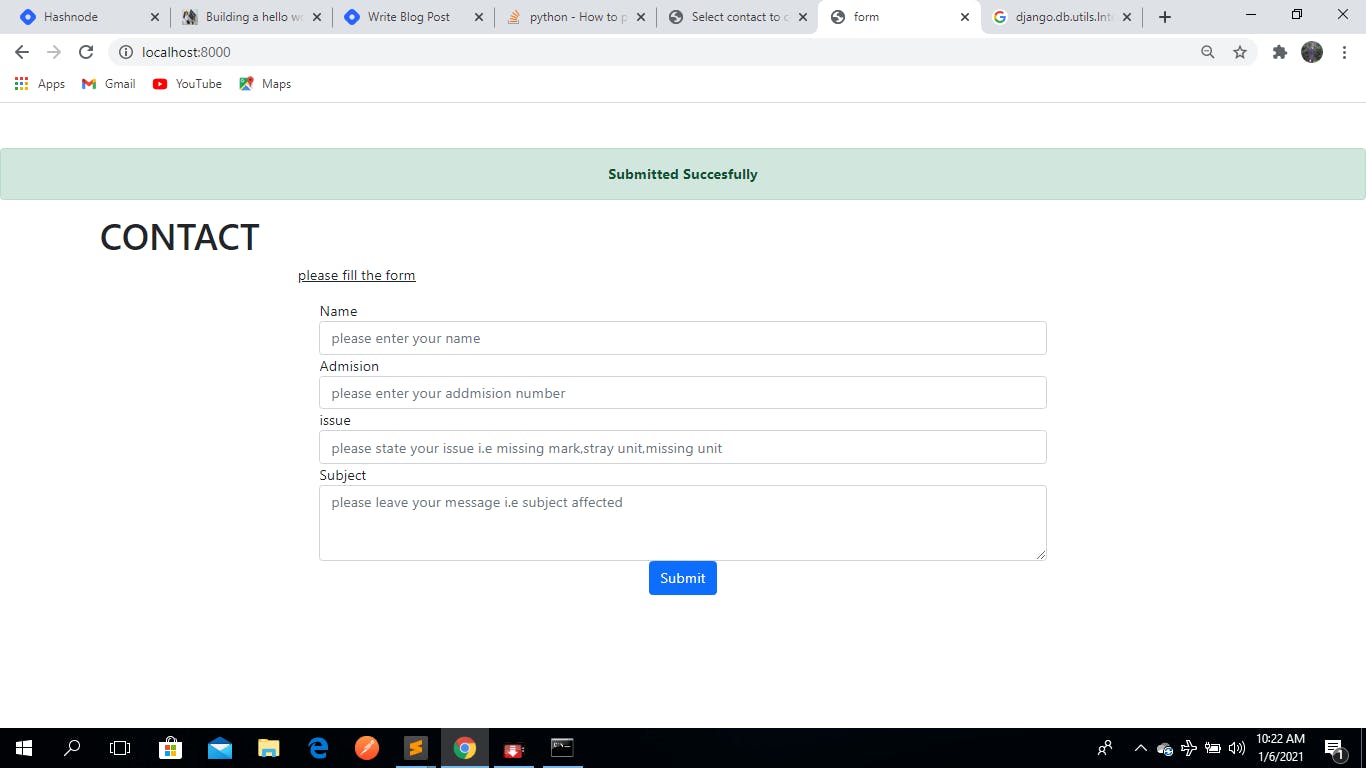
refresh the http://127.0.0.1:8000/ url in the adress
should look like this and after filling the form a pop us succces message sholud show

Go to the admin interface and see if the information filled is saved under the contact section .
THERE YOU GO NOW
written by Ian

